Rodin Handbook
This work is sponsored by the Deploy Project
This work is licensed under a Creative Commons Attribution 3.0 Unported License
| User Manual for Rodin v.2.3 |
3.1.6 Auto Prover
The auto-prover can be configured by means of a preference page, which can be obtained as follows: press the “Window" button on the top tooolbar. On the coming menu, press the “Preferences" button. On the coming menu, press the “Event-B" menu, then the “Sequent Prover”, and finally the “Auto-Tactic" button. This yields the window in Figure 3.31.
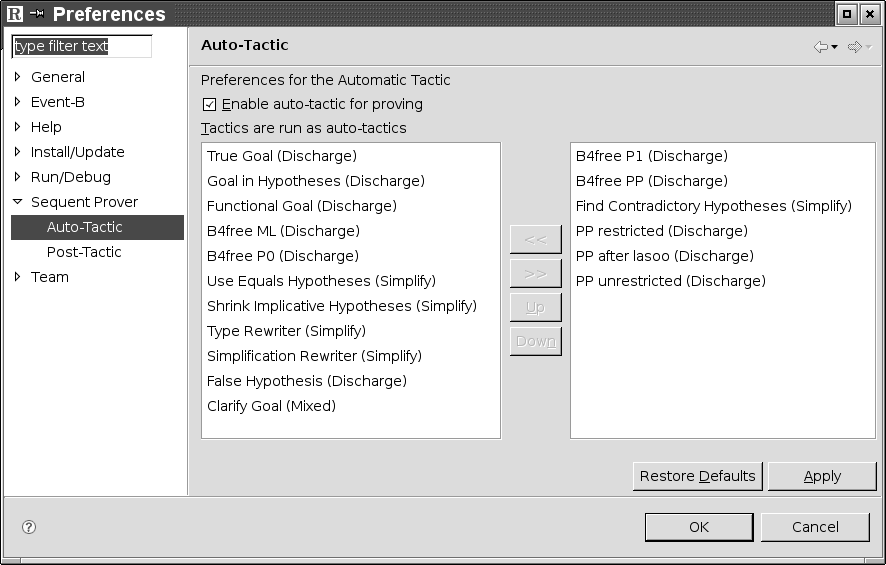
On the left part you can see the ordered sequence of individual tactics composing the auto-prover, whereas the right part contains further tactics you can incorporate in the left part. By selecting a tactic you can move it from on part to the other or change the order in the left part.
3.1.6.1 The Search Hypotheses View
By typing a string in the Proof Control view and pressing the Search Hypotheses (
![\includegraphics[height=2ex]{img/icons/rodin/sh_prover.png}](images/img-0313.png) ) button, a window is provided which contains all the hypotheses that have a character string in common with the one entered by the user in the editing area. For example, if we search for hypotheses involving the character string “cr", then after pressing the Search Hypothesis (
) button on the Proof Control view, we obtain the windows as shown in Figure 3.32.
) button, a window is provided which contains all the hypotheses that have a character string in common with the one entered by the user in the editing area. For example, if we search for hypotheses involving the character string “cr", then after pressing the Search Hypothesis (
) button on the Proof Control view, we obtain the windows as shown in Figure 3.32.
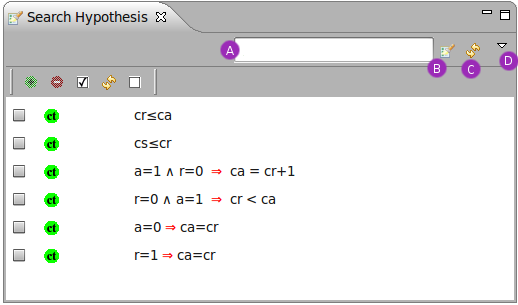
This view also integrates a “quick search" area (A), that allows us to search quickly hypotheses involving short character strings such as “cr", a search hypothesis button (B) that behaves the same as the button of the proving window, a refresh button (C) that updates the window manually for more control, and a drop down menu (D) to set the preferences of the view up.
By pressing return key or the button (B) (once a short string has been entered into the input area (A)), hypotheses can be searched quickly as if we used the Proof Control as described before.
The drop down menu (D) allows some preferences about the searched hypotheses to be set.
If we change preferences for the search, we might need to manually “update” the view with the button (C). By selecting the “Consider hidden hypotheses in search" option, we can review all hypotheses that have been unselected in the Selected Hypotheses window.
To move hypotheses to the Selected Hypotheses window, select the wanted hypothesis (using the check boxes) and press the
![\includegraphics[height=2ex]{img/icons/rodin/add.png}](images/img-0019.png) button. Adding these hypotheses to the selected hypotheses means that they will be visible to the prover. They can then be used during the next interactive proof phase.
button. Adding these hypotheses to the selected hypotheses means that they will be visible to the prover. They can then be used during the next interactive proof phase.
To remove hypotheses from the Search Hypotheses window, use the
![\includegraphics[height=2ex]{img/icons/rodin/remove.png}](images/img-0396.png) button. This button also appears above the selected hypotheses and allows the user to remove any hypothesis from the Selected Hypotheses window.
button. This button also appears above the selected hypotheses and allows the user to remove any hypothesis from the Selected Hypotheses window.
The other button, situated to the left each hypotheses, is the
![\includegraphics[height=2ex]{img/icons/rodin/falsify_prover.png}](images/img-0431.png) button. Clicking on this will attempt a proof by contradiction. The effect is the same as if the hypothesis were in the Selected Hypotheses window.
button. Clicking on this will attempt a proof by contradiction. The effect is the same as if the hypothesis were in the Selected Hypotheses window.
3.1.6.2 The Cache Hypotheses Window
This window allows the user to keep track of recently manipulated (i.e., used, removed, or selected) hypotheses for any PO. For example, when the user applies a rewrite to a hypothesis, a new hypothesis (after the rewriting) is selected, and the original hypothesis is deselected and put in the Cache Hypotheses window.
Similar operations (to that of the Selected Hypotheses and Search Hypotheses windows) such as removing, selecting and proof by contradiction (ct) are also available for the cached hypotheses. Interactive proof steps (e.g., rewriting) can also be carried out from the Cache Hypotheses window.
3.1.6.3 Proof Information View
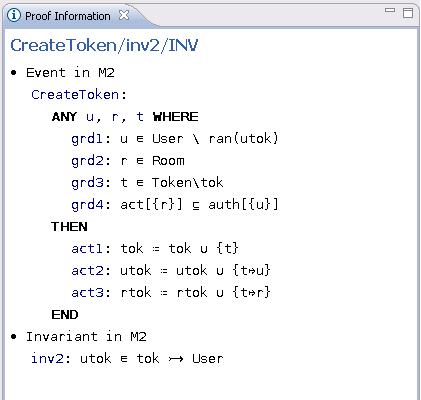
This view displays information so that the user can relate a proof obligation to the model. For example, typical information for an event invariant preservation includes the event as well as the invariant in question. For instance in Figure 3.33, the hyperlinks CreateToken and inv2 can be used to navigate to the containing machine.
3.1.6.4 Rule Details View
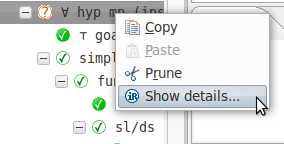
This view displays the information relating to a given proof tree node onto which a rule was applied. A command is available when right-clicking on a proof tree node in order to reveal the Rule Details view (See Figure 3.34).
By default, this view is a fast view. If the window does not appear, seek the button (identified by the view’s icon) at the bottom left of the workbench to make this view visible.
Figure 3.35 gives an overview of the Rule Details View.

A quick summary of the applied rule contents is provided. In this figure, we display the contents of the rule named  hyp mp, where an input has been used to instantiate an hypothesis. One can quickly see the input that was used to instantiate the rule (the line below Rule: hyp mp instantiated with:), and the hypothesis that was considered by this rule (the line below Input Sequent:). Furthermore, it is possible to view the antecedents created by this rule in details (i.e. child proof tree nodes) and the actions performed on the hypotheses (selection, deselection, etc.).
3.1.6.5 Auto-tactic and Post-tactic
The auto-tactic automatically applies a combination (i.e. ordered list) of rewrite tactics, inference tactics and external provers to newly generated proof obligations. However, they can also be invoked by the user by clicking on the
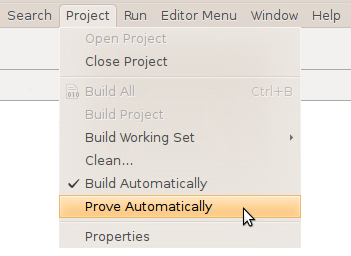
![\includegraphics[height=2ex]{img/icons/rodin/auto_prover.png}](images/img-0341.png) button in the Proof Control view. Note that the automatic application of the auto-prover can be quickly toggled with the Prove Automatically menu item available from the Project menu (See Figure 3.36).
button in the Proof Control view. Note that the automatic application of the auto-prover can be quickly toggled with the Prove Automatically menu item available from the Project menu (See Figure 3.36).
The post-tactic is also a combination of rewrite tactics, inference tactics and external provers and is applied automatically after each interactive proof step. However, it can also be invoked manually by clicking on the
![\includegraphics[height=2ex]{img/icons/rodin/broom_prover.png}](images/img-0440.png) button in the Proof Control view.
button in the Proof Control view.
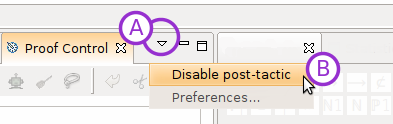
Note that the post-tactic can be disabled quickly by clicking on the little arrow (marked with an A) of the Proof Control view (right upper corner) and then on Disable post-tactic option (B) as shown in figure 3.37.
3.1.6.5.1 Principles
The ordered list of rewrite tactics, inference tactics and external provers that should be applied is called a profile. There are two default profiles. One is for auto-tactics and one is for post-tactics. These default profiles are immutable in time but can be duplicated for further modification by the user. The user can edit a profile and select it to run as automatic or post tactic. The idea is to have a set of available tactic profiles to be used as needed. Moreover, these edited profiles are shipped with projects if defined at the project level or can be imported or exported if defined at a workspace level. This makes it easy to share the profiles.
There are two ways to run the automatic or post tactics:
Manually by clicking on the
button or the
button in the Proof Control view to launch the auto-tactic (with the selected auto-tactic profile) and the post-tactic (with the selected post-tactic profile) respectively. Automatically if such preference is activated. (Auto-tactic will then run after each proof step and post-tactic will run after each step and rebuild). Post-tactics and auto-tactics only need to be activated in order to run automatically (see previous sections on how to activate auto- and post-tactic).
The user can separately define tactic profiles and assign them to post and auto tactics. Therefore, there are two tabs in the Auto/Post Tactic preference page for each of these choices. These tabs will be described in Section 3.1.7.4.