Rodin Handbook
This work is sponsored by the Deploy Project
This work is licensed under a Creative Commons Attribution 3.0 Unported License
| User Manual for Rodin v.2.3 |
3.1.7 Preferences
Rodin provides several options to set preferences the Event-B editor. You can access the preferences via Window  Preferences Event-B in the menu bar. The following subsections describe the different preference option.
3.1.7.1 Appearance
This section provides settings for the Event-B editor appearance.
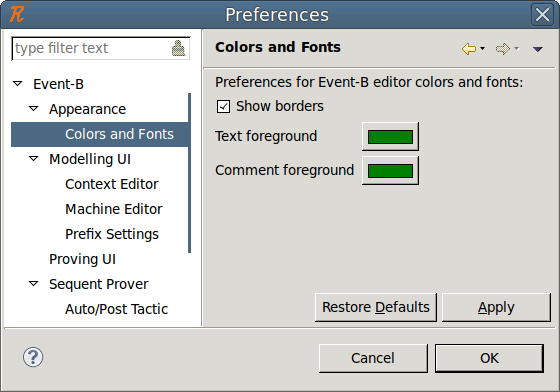
3.1.7.1.1 Colours and Fonts
The colour and fonts preference page allows you to set the text and comment colour of the Event-B editor. Furthermore, it allows to toggle on or off the borders of the different fields in the Event-B editor. Figure 3.38 shows the Colours and Fonts preference page.
3.1.7.2 Context and Machine Editor
The context and machine editor preference pages allows you to customize the visible tabs of the context and machine editor.
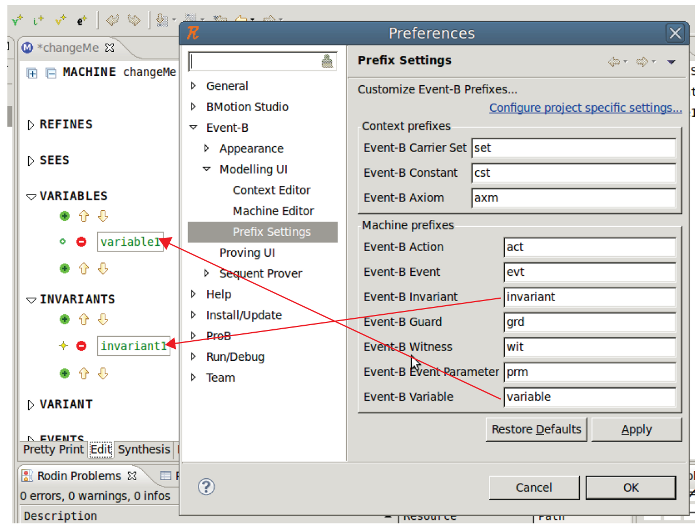
3.1.7.3 Prefix Settings
This page describes the mechanism used to set element prefixes and perform renaming using dedicated actions for both machines and contexts. Note that prefixes are used for automatic renaming when elements should be alphanumerically ordered as well as when new elements are created.
Figure 3.39 shows that modifying prefixes on the workspace level or on the project level will affect the names used at creation of new Event-B elements. One can see that the prefixes for variables and invariants, which were originally set to “var" or “inv”, have been replaced by “variable" and “invariant". New elements are then named using those prefixes.
3.1.7.3.1 How to set prefixes
Prefix settings can be accessed through in two different ways depending on the scope of their application: Window Preferences Event-B Modelling UI Prefix settings or directly via, Rename Customize prefixes....
3.1.7.3.2 Project specific settings
The user can select profiles locally for a project. To do so, you can select the Prefix Settings property page available via right-click on a project and select the Properties item. You can also click on the Configure project specific settings link on the Prefix Settings preference page. In this case, one will have to choose the project for which the prefixes should be set up. This is allowed via a specific project selection dialog. After the project selection, a dialog for prefix settings opens for the selected project.
A window (see Figure 3.40) appears, where a page handling prefixes settings allows a user to customize prefixes for a chosen project. On this page, the user can toggle the button Enable project specific settings.
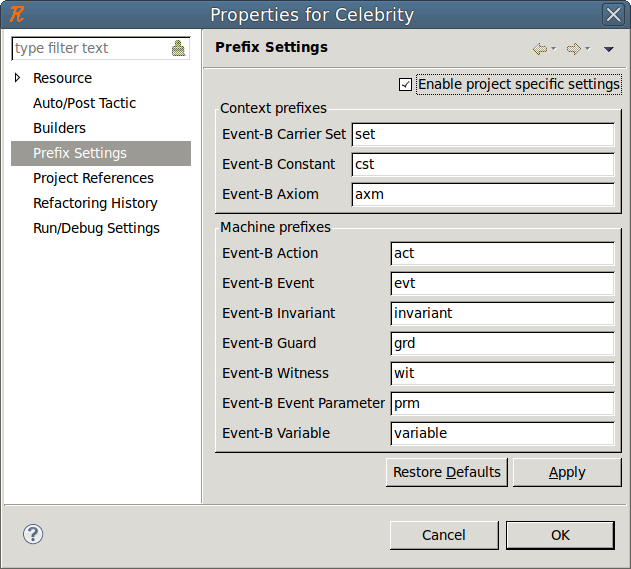
If this button is enabled, the prefixes used are those which are specified at this project level.
If this button is not enabled, the prefixes used are those which are defined at the workspace level.
3.1.7.4 Sequent Prover / Auto/Post Tactic
3.1.7.4.1 Preferences for the selected auto and post tactic profile
This section describes the Auto/Post Tactic tab of the Auto/Post Tactic preference page.
There are two scopes to set up preferences for the auto and post tactics: the workspace level and the project level. Note that if the automatic application of tactics is decided only at the workspace level, this option will also be set for the project level.
To access these preferences, open the “Auto/Post Tactic" preference page that can be found after Window Preference Sequent Prover.
Figure 3.41 shows the Auto/Post Tactic preference page.
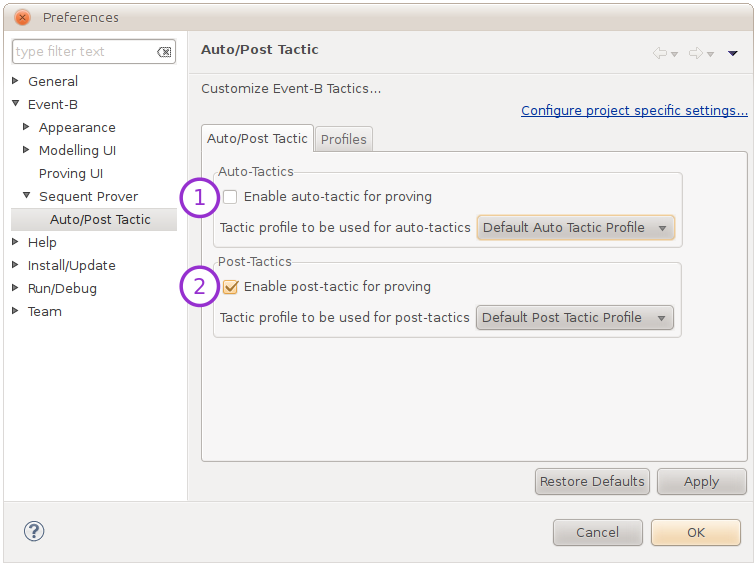
The buttons 1 and 2 are activating/deactivating the automatic use of auto- and post-tactics. Here you can also choose the profile that should be used for auto- and post-tactics. Note that there is always a profile selected, and this profile can be changed regardless of whether the tactics are automatically launched or not because there is always a way to manually launch auto- and post-tactics. On the previously references figure, the Default Auto Tactic Profile is used for the automatic tactic, and the Default Post Tactic Profile is used for the post-tactic.
3.1.7.4.2 Preferences for available profiles
This section describes the Profile tab of the Auto/Post Tactic preference page.
Figure 3.42 shows the contents of the profile tab. There are two visible lists: a list of profiles on the left and the tactics or provers that compose these profiles (Profile Details). Here one can see the contents of the default Auto Tactic Profile.
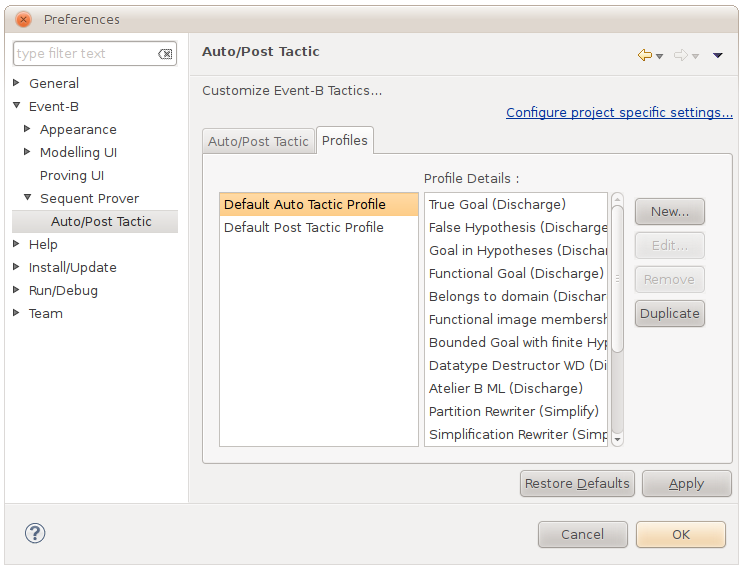
There are 4 buttons available to the user:
New: to create a new profile “from scratch",
Edit: to edit an existing (editable) profile,
Remove: to remove a profile definitively,
Duplicate: to duplicate a selected profile for further slight modification.
Default profiles can not be edited nor removed. That is why they this option appears in gray on the previously referenced figure.
Figure 3.43 shows the dialog available to edit or create a profile. For instance, here we create a profile named “MyFirstTacticProfile".

The list on the right represents the available and unselected tactics. The list of the left displays the profile contents and shows the selected tactics that will be applied from the top to the bottom. The user can choose a tactic from the list on the left and hit the  button to select it or unselect some tactics from the list of the right using the
  button. The user can re-order the priority of the selected tactic using the Up and Down button. By clicking on Finish, the profile will be saved and available for use in the auto and post tactics.
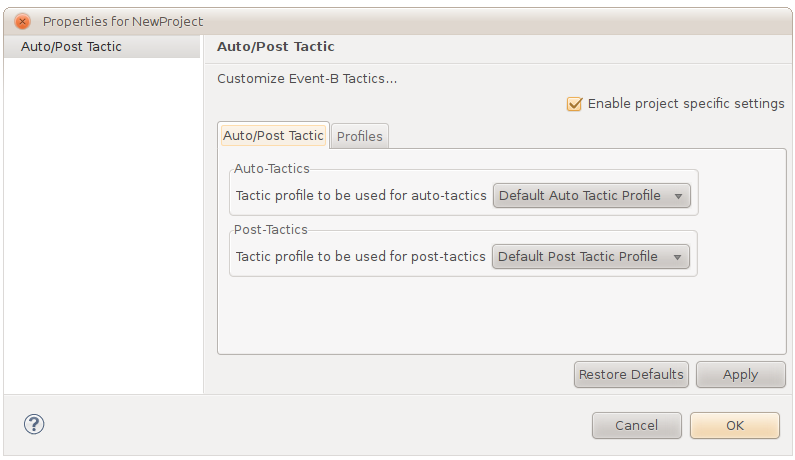
3.1.7.4.3 Project specific settings
The user can select profiles locally for each project. To do so, select the Auto/Post Tactic property page available via right-click on a project and select the Properties item, or click the Configure project specific settings link on the Auto/Post Tactic preference page. Figure 3.44 shows what this Auto/Post Tactic tab looks like.
Note that the enablement of automatic use of post and auto tactics is decided at the workspace level. Figure 3.45 shows the Profiles tab of the Auto/Post Tactic page for a project specific setting. At the project level, there is a contextual menu available via right click from the list of defined profiles.
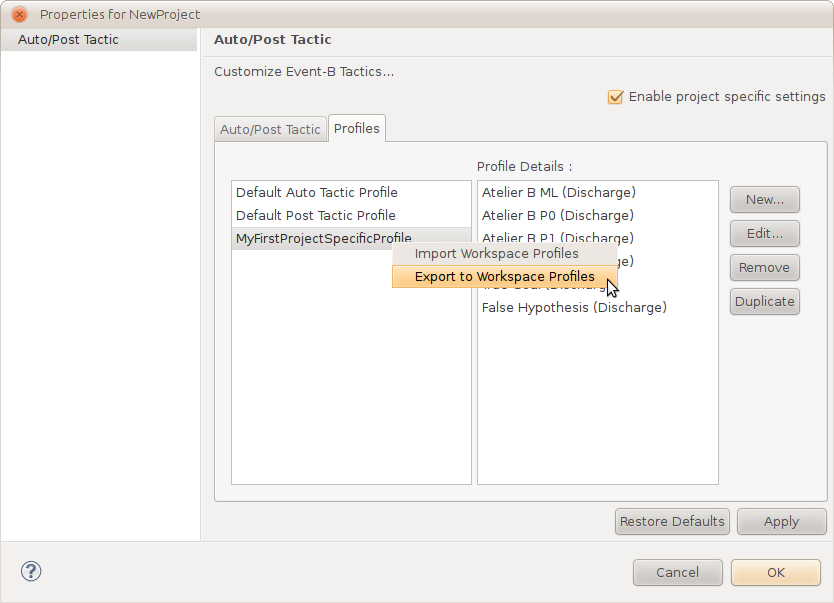
This contextual menu offers two options to the user:
Import Workspace Profiles retrieve all the defined profiles in the workspace.
Export to Workspace Profiles push a selected profile up in the list of workspace profiles.
3.1.7.5 Preferences for the automatic tactics
3.1.7.5.1 Introduction
The purpose of this section is to give a more detailed preferences to the user so he can build his own automated tactics. More precisely, the user should have a way to specify which parameters have to be passed to the reasoners and have a way to construct complex proof strategies.
3.1.7.5.2 User Documentation
Here is the documentation about the current implementation of the Auto-tactic and Post-tactic preferences.
3.1.7.5.3 Tactic Combinators
Tactic combinators can be used to construct complex proof strategies.
Historically, one combinator has existed since the beginning of auto tactic preferences: the “loop on all pending". It takes one or more tactics and loops them over every pending child until all tactic fail. Until Rodin 2.3 was released, it was the only combinator in Rodin. It is used on the configurable list of auto and post tactics. Rodin 2.3 is easier to configure because there are several other combinators and auto tactic editors.
The following is a list of combinators present by default.
One may notice the absence of child-specific combinator (i.e. combinators that apply tactic T1 on the first child, T2 on the second child, etc.) even though this kind of combinator exists in other provers. The reason is that we are concerned mainly auto tactics and these are tactics that are attempted in a general context. Provers with child-specific combinators are used to make manual proof because they require proof-specific adaptation.
3.1.7.5.3.1 Composers
A composer combinator applies its given tactic(s) to the given node. The given node may be open or closed. It succeeds if at least 1 tactic application is successful.
Name |
Arity |
Description |
Stops when |
Sequence |
1..n |
applies given tactics in given order |
all tactics have been applied |
Compose until Success |
1..n |
applies given tactics in given order |
a tactic application succeeds |
Compose until failure |
1..n |
applies given tactics in given order |
a tactic application fails |
Loop |
1 |
applies given tactic repeatedly |
the child tactic application fails |
3.1.7.5.3.2 Selectors
A selector combinator applies its given tactic to the set of nodes it selects. Selected nodes are computed from the given node. The given node may be open or closed. It succeeds if the tactic application is successful for at least 1 selected node.
Name |
Arity |
Selects |
On all pending |
1 |
all pending children of the given node (the given node itself if it is open) |
3.1.7.5.3.3 Post Actions
A post actions applies its given tactic to the given node. The given node must be open (otherwise it fails). Then it performs a specific treatment which is guarded by a trigger condition.
Name |
Arity |
Trigger Condition |
Post Action |
Attempt |
1 |
the given node still has pending children (subtree not closed) |
prune proof tree at given node |
3.1.7.5.3.4 Loop on All pending

3.1.7.5.4 Other Ideas
timeout: a post action of arity 1 (with duration as input): limits the time allocated for the tactic that it is applied to (fails after time has gone out)
limitDepth: a post action of arity 1 (with depth as input): limits the proof tree depth for the tactic that it is applied to (prevents tree from growing beyond a given depth)