Rodin Handbook
This work is sponsored by the Deploy Project
This work is sponsored by the ADVANCE Project
This work is licensed under a Creative Commons Attribution 3.0 Unported License
2.4.2 Project Setup
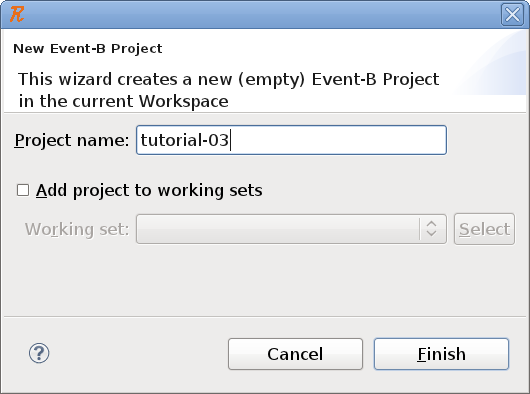
Models typically consist of multiple files that are managed in a project. Create a new Event-B Project File  New
New  Event-B Project. Give the project the name tutorial-03 as shown in Figure 2.5.

![\includegraphics[width=7mm]{img/warning_64.png}](images/img-0004.png)
Eclipse supports different types of projects. The project must have the Rodin Nature (3.1.1.2) to work. A project can have more than one nature.
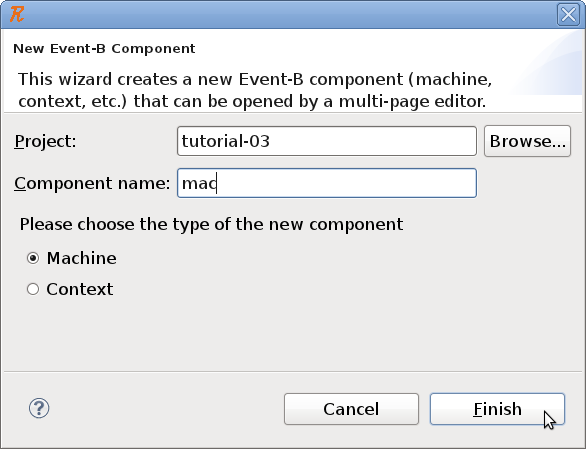
Next, create a new Event-B Component. Either use File  New
New  Event-B Component or right-click on the newly created project and select New
  Event-B Component. Use mac as the component name, select Machine as component-type, and click Finish as shown in Figure 2.6. This will create a Machine (3.2.4) file.

The newly created component will open in the Rodin Editor. This displays the machine hierarchy as text, although at this point, you cannot add any text apart from comments. Elements can be added to the model by using the wizards for variables, variants, invariants, and events (the
![\includegraphics[height=2ex]{img/icons/rodin/newvar_edit.png}](images/img-0018.png) ,
,
![\includegraphics[height=2ex]{img/icons/rodin/newvariant_edit.png}](images/img-0019.png) ,
,
![\includegraphics[height=2ex]{img/icons/rodin/newinv_edit.png}](images/img-0020.png) , and
, and
![\includegraphics[height=2ex]{img/icons/rodin/newevt_edit.png}](images/img-0021.png) buttons).
buttons).
You can also add elements by finding the name of the machine under the MACHINE heading. There is a small green arrow (
![\includegraphics[height=2ex]{img/icons/rodin/structured_arrow.png}](images/img-0022.png) ) directly to the right of the name of the machine (in this case, the name of the machine is “mac"). Place your cursor directly to the left of the green arrow and right click. Select the element that you would like to add from the Add Child menu. If an element of a certain type has already been created, you can also create more elements of that type by right clicking on the type of the element you would like to add (e.g. VARIABLES) that is coloured in purple and select Add Child. You can also place your cursor directly before the green arrow to the left of an element name and hit CTRL-T or right click and select Add Sibling.
) directly to the right of the name of the machine (in this case, the name of the machine is “mac"). Place your cursor directly to the left of the green arrow and right click. Select the element that you would like to add from the Add Child menu. If an element of a certain type has already been created, you can also create more elements of that type by right clicking on the type of the element you would like to add (e.g. VARIABLES) that is coloured in purple and select Add Child. You can also place your cursor directly before the green arrow to the left of an element name and hit CTRL-T or right click and select Add Sibling.
You can also edit the machine using the Event-B Machine Editor. This was the default editor in Rodin 2.3 and earlier versions and is still available to view and edit machine files. To do this, right click on the mac component in the Event-B Explorer and select Open With  Event-B Machine Editor. This editor has four tabs at the bottom. The Pretty Print tab shows the model as a whole with color highlighting, but it cannot be edited here. This is useful to inspect the model. Under the Edit tab, you can edit the model. The six main sections of a machine (REFINES, SEES, etc.) are displayed in a collapsed state. You can click on the
![\includegraphics[height=2ex]{img/icons/rodin/collapsed.png}](images/img-0023.png) button to the left of a section to expand it.
button to the left of a section to expand it.
This editor is form-based. This means that it can be modified by using controls (i.e. text fields, dropdowns, etc.) to input information. More information about this editor is available in the reference section (3.1.5).
![\includegraphics[width=7mm]{img/info_64.png}](images/img-0003.png)
Alternative editors are available as plugins. The form editor has the advantage of guiding the user through the model, but it takes up a lot of space and can be slow for big models. The text-based Camille Editor (2.4.3) is very popular. Please visit the Rodin Wiki (1.1.2) for the latest information.